Image Map

Avocado Arts + Teacher Love


     Hey there friends! Here to share an Avocado Arts creation with the September set, Grateful Season
This design is actually a little treat bag that you can give a teacher to welcome them back to school. You can place pencils, erasers, pens, etc. inside and use the front as the card!  I stamped the apple on patterned paper, trimmed and then affixed to the bag with foam tape. Some fun school font stickers, and a cute wooden ruler help tie the theme together.

From the Grateful Season set I stamped the two patterned circles, and added the "thankful" border around the polka dot circle. The juxtaposition of elements on the bag moves your eye from "thankful" to "for you"

Well, that's it for me today! Make sure to visit the rest of today's crew to see the fabulousness that they've come up with!


materials:


Avocado Arts + Sneaks of Fall

  
     Hello there friends! Today is sneak peak day with Avocado Arts. I love this day! The Pit Crew combines the current set with a sneak of next month's set. Today's card has a fun sneak peak. Can you find it?

So, I live in California where we don't have seasons. I am told that there is a season called, "Fall" heading our way, but it's still 90 and sunny in the state. So, I decided to try and welcome fall to California by mixing pumpkins from the Thankful For You set with the acorns and leaves from next month's release.

I stamped the pumpkins shape with the back of the pumpkin stamp first to get a full background, then I flipped the stamp over and stamped the pumpkin on the background. I stamped the acorns and leaves in coordinating colors and added a simple sentiment.

So, as mentioned on the Avocado Arts facebook page, were having a giveaway of three adorable little mini sets! Make sure to leave a comment on each Pit Crew blog for a chance to win! Winners will be picked randomly on August 17th and announced on the blog and facebook page. Here's what you could win!

Well, that's it for me today! Make sure to stop by the other Pit Crew blogs for amazingly creative and inspiring ideas!

GCD + Fun with Stars

     Hey there friends! Happy to share some fun GCD Studios cards with you today that focus on stars! You can find them in the latest issue of GCD Studio's The Paper Cut e-zine. Since September is the "back to school" month, I wanted my cards to have that cute, schoolish feel to them, complete with using stars in a new way as the focal point.

This card focuses on using the negative punch of the star to highlight the shape. I also added a stamped sentiment in school-like cursive and a large letter sticker to give it that alpha quality.

I chose a complementary color scheme of reds and greens. I incorporated the light values of the shade of red, found in pink dotted and lined paper. It helped draw attention to the stars.

Since school is right around the corner, I incorporated some lined paper in this encouraging card that you could give your favorite student before a big show, assignment or test.

Who doesn't want to get a star on their assignment? This card gives you plenty, layered together for an extra dose of confidence!

How can you use stars in your paper-crafting projects with GCD Studios paper?

Supplies: 
"Celebrate U Stars" Card: Country Charm collection: Country Bloom (1505), Floral Field (1507), Strawberry Jam (1510). Sweet Tooth collection: Sprinkles (1560). Other Supplies: Clear stamps: Sentiment (PTI). Ink (Tsukineko). Tape (Queen & Co.). Letter sticker (Basic Grey) Blue twine. Star & circle punch (Fiskars).
"UR Great" Card: Bonjour collection: Ooh La La (1540). Country Charm collection:  Super Star (1511). Tiny Floral Border (1513), Weekend Fun (1515) Other Supplies: Clear stamps: Sentiment (PTI). Ink (Tsukineko). Tape (Smash). Red Pearls (Queen & Co.). Letter stickers (Basic Grey) Yellow trim. Twine (Pink Paislee). Star & circle punch (Fiskars). Notebook paper.

GCD Studios + Back to School Awesomeness


     Hey there friends! GCD Studios has been focusing on back to school projects because September marks the beginning of school seasonI These cards were featured in this month's edition of The Paper CutGCD Studios newest e-zine filled with tips, tricks, ideas and fun projects! These two cards used only paper from the Country Charm collection and have a fun back-to-school theme.

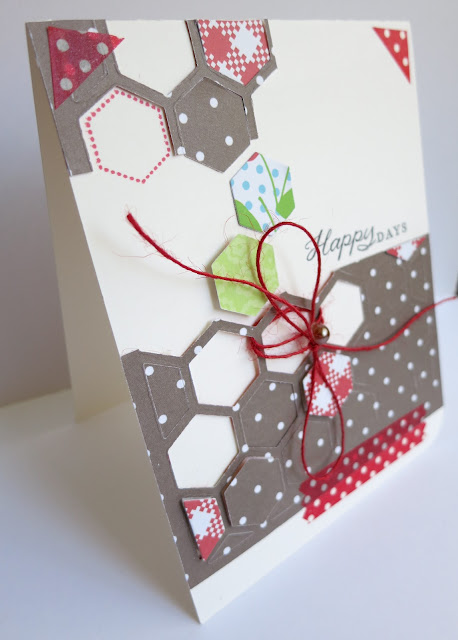
Mixing fun trends like the polka dots in the patterned paper and hexagon die cuts make this card playful and perfect for your young back-to-schooler!  

Play around with your die cuts. I die cut a panel of pattern paper and then trimmed some off. Creating movement though "falling" hexagons highlights the bold colors and patterns of the paper. Back-to-school is a happy milestone in a kid's life, add a sentiment to your card and present it to your little scholar on the first day back. 

Remember those wooden desks in your classroom? Well, I sure do-this woodgrain paper brings back the memories of writing on those laminate desks! It also provides a great backdrop for the "Super Star" title and theme of this card.

A cute variety of patterned paper stars against the fun green patterned paper and woodgrain patterned paper work well together and lead the eye to the mini chalkboard sentiment!

Supplies:
"Hexagon Happy Days" Card: Country Charm collection: Cherry Pie (1504), Picnic Blanket (1509). Splendor collection: Letter Tiles (1680). Bonjour collection: Paris Je T'aime (1541) Other Supplies: Clear stamps, Sentiment (PTI). Ink (Tsukineko). Hexagon Die (PTI). Tape and brown pearl (Queen & Co.) Red twine (May Arts).
"Super Star" Card:  Country Charm collection: Cherry Pie (1504), Picnic Blanket (1509). Splendor collection: Letter Tiles (1680). Bonjour collection: Paris Je T'aime (1541) Other Supplies: Script Alpha Stickers (Studio Calico). Mini Market stickers (October Afternoon).  Brown dotted ribbon (Bo Bunny). Corner Rounder and Wave Border punch (Fiskars). (Star punch) Epiphany Crafts. Miniature chalkboard clip (Michael's).

SEI Goes Bohemian


     Hey there! SEI's Lifestyle blog isn't just about using paper, it's about being inspired by it! SEI's new Mirelle collection inspired me with it's warm POP of fuschias, violets and turquoise and totally trendy motifs! For today's project I was inspired to make this Bohemian-styled Hanging mobile. The dictionary defines "bohemian" as an artist who  sets social conventions aside, and goes their own way in terms of design. It can be something made from nothing, or taking what you have and making something new, unique and functional from it. Common elements found in Bohemian art and style are beads, colors, textiles and collections from around the world. Bohemian decor is free-flowing and can show movement in how it's layered over a surface or draped, much like this mobile

The rich and deep colors and patterns found in Mirelle appealed to me most when I made this mobile. I loved the combo of sophisticated colors and patterns that reminded me of funky fabrics. I couldn't pick just a few of the patterned papers from this collection to use, so I used all of them.  What's fun about the flowing circles, is watching them slowly sway and spin back and forth in the breeze. 

For the structure of the mobile I wanted to incorporate beads and textured ribbon trim commonly found in Bohemian design. I pulled the vibrant turquoise found in the Mirelle and used it as the base color of the mobile. I used rich purple ribbon trim to attach the paper garland strands.

This mobile is so easy to make. All you'll need is patterned paper from the Mirelle collection, a 10" embroidery hoop, a wooden dowel, acrylic paint, ribbon trim, wooden beads, clear jewelry wire, a jump ring and circle punch.

Trim your dowel into 4 5" pieces. Paint dowels and beads and let dry.

Punch circles from patterned paper. I punched 16 circles from each patterned paper in the Mirelle collection. Stitch the circles into a garland.

Pull jewelry wire from spool and line it up parallel to dowel with at least 3". Thread 14 beads through wire and dowel. Repeat for the remaining three dowels.

Attach one side of the beaded dowels equal distance apart by tying the excess jewelry wire around the hoop. Knot together the remaining excess jewelry wire from the other ends of the beaded dowels together. Adhere the dowels to a jump ring.

     You could use this mobile to decorate a space or even hang it above a baby's crib. I'm going to hang it in my classroom! Hope that you're inspired to make something bohemian-styled with the Mirelle collection!

Avocado Arts + Being Grateful

Hey there friends! I'm happy to share with you Avocado Arts' September release, Grateful Season. This set has fabulously big stamps like a sunflower and pumpkin, mixed with a fun and cute little worm and my personal favorites, borders and patterned stamps like the hatched and dotted circles. Here's what I designed using this adorable fall set.

The border stamp has this cute cross-stitching feel to it which is pretty and very country fresh! 

 I stamped a lighted green cross-stitched block over the border to create some movement. I mixed the sentiment with some letter stickers to personalize the card!

Well, that's it for me today! Make sure to visit the rest of today's crew to see the fabulousness that they've come up with!

Emily Leiphart

materials:


GCD + September's Papercut Magazine

Hey there friends! Check out the latest issue of GCD Studios ezine, The Papercut magazine. 


SEI's 2013 Team!

     Hey there friends! I am so happy and pleased to announce that I was asked to continue designing for SEI. I so truly love their papers, embellies, beautiful designs and friendly art team! I feel blessed and honored to design for them on another term. Say hello to the newest members of our team!
and returning 2011-12 DT member, 
 
Pin It button on image hover